Monday, February 13, 2012

7th Grade: Value Portraits using Picnik

1. Take a picture of yourself . Your pose can be serious, silly, intellectual, etc. Save it on Miss Tobin's flash drive and on the Desktop of the computer. You may also find an image of a person you admire (ex. celebrity, athlete, family member, etc.)
2. Open www.Picnik.com in your browser
3. Click "Get started now"
4. Click "upload a photo"
5. Select your file, which should be on the Desktop

 6. Select the "Crop" tool, which is under the Basics menu. Crop the image until you are satisfied, then hit apply.

 
7. Click on the "effects" tab and select "Black and White" Click "apply"
8. Scroll down and choose the "Posterize" effect under the Misc effects. Click "apply"
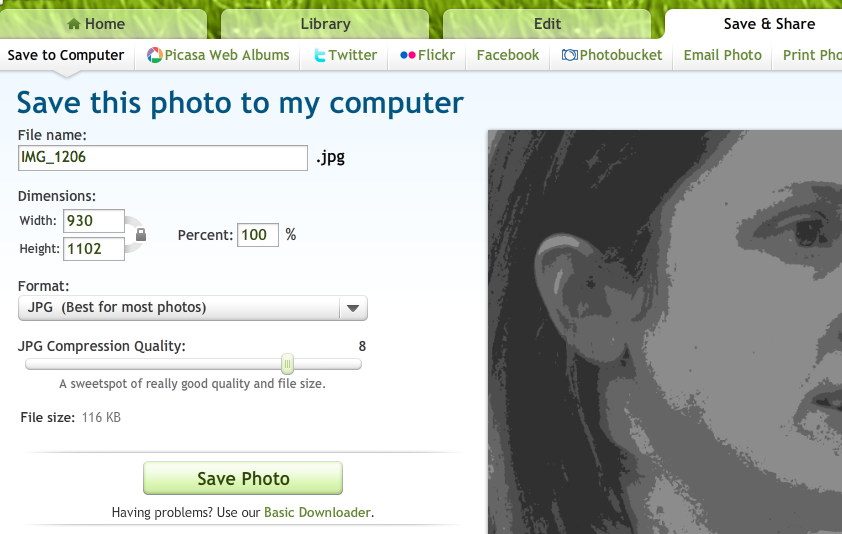
9. Now click on the "Save and Share" tab. Give your file a title and save to the Desktop.


10. Open image on your desktop and Print to MS Hall 02. Be sure to change the orientation of your image so that it prints as large as possible. (click on the orientation button on the middle of the screen below.
11. PRINT 2 COPIES!!
12. Give your image to Miss Tobin so that she can it down to size
13. Place a piece of vellum over your image. Using an ultra fine Sharpie, trace each section of Value.
14. Make a 2" x 2" grid on a piece of white paper using a ruler and a hard pencil (H or harder)


Monday, December 12, 2011

Grade 7: Silhouette Project

1. Take a picture of yourself doing something that interests you with a camera

2. Collect at least three "i verb" words. Cut the letters out of magazines and put them safely in an envelope with your name on it (examples of words are "i eat" "i sleep" "i ride").


3. Trace your silhouette (which will be projected onto the board) onto a piece of 18 x 24 paper

4. Go over you silhouette with a Sharpie marker

5. Divide your background into sections such as : horizontal or vertical lines, contour lines, lines converging at a vanishing point, etc.

6.Choose a pair of complementary colors (ex. yellow and purple, red-violet and yellow-green)

7. Practice making tints and shades of a color with a partner

8. Paint the background of your silhouette tints and shades of one color/hue. Paint your silhouette with the complementary color


9. Glue down your "i verb" words

10. Retrace silhouette with Sharpie marker


Thursday, March 24, 2011

6th Grade: Contour Line Drawings of Shoes

Elements and Principles of Design:
Line, Color, Repetition

Day 1: (50-70 min) What is a contour line? Demonstrate several warm-up activities, including drawing the creases of the palm of your hand and a blind contour line drawing of a shoe, stressing the importance of looking at what you are drawing. Discuss the Right Brain vs. Left Brain. Students should complete one drawing of a shoe that they are pleased with on newsprint. This gesture will be traced three to six times on 12x18 watercolor paper.

Day 2/3: (50-70 min) What are warm colors? Cool colors?  Students will decide if they want warm colored shoes, or cool ones. Shoes will be outlined with warm or cool colored crayons as this helps to contain watercolors when painting. What is a watercolor wash? Demonstrate the 10 watercolor washes listed below. Have students practice on 3 x 12 inch strip of WC paper.  Students must incorporate all ten WC washes into his/her shoe painting. If the shapes are warm, background is cool and vice-versa. This helps prevent muddled colors.


Watercolor Washes:
Wet-on Wet     Even
Glazing           Gradual
Blotting           Resist
Salt                 Splatter
Blow               Dry Brush

Vocabulary:
Contour Line
Negative Space
Observational Drawing
Watercolor wash
Warm and Cool colors

Materials for Hands:
Drawing boards
Shoes
Sharpies
Newsprint
12 x 18 watercolor paper
Light table

Materials for Watercolor Painting
Crayons
Prang Oval 16 colors watercolors
Brushes
Water Containers
Paper towels
Kosher Salt
3 x 12 strip of watercolor paper


Thursday, February 3, 2011

7th Grade: Oaxacan Wood Sculptures

Day 1: What is sculpture? Where is Oaxaca? Show student PowerPoint (includes map of Mexico, copal tree, artists at work, examples, close up of details). Explain how this craft supports the artist financially. Demonstrate how to use random wood pieces to create an animal with dimension/form. Demonstrate the best use of the hot glue gun (I show them how to use a Popsicle stick to push things together and avoid touching the hot glue).

Day 2/3: Finish building. Demonstrate how to paint the base layer one or two solid colors with acyclic paint. Tempera can be used, as it tends to be more colorful, but causes problems when painting additional layers on top for the next step. What is pattern? While waiting, students can brainstorm ideas for the intricate patterns they will add using paint or markers.


Materials:
PowerPoint with visuals of sculptures, artists, map of Mexico
Google Earth
Boxes of wood scraps
Clear Plastic Bins to put wood in (more visible)
Hot Glue Guns
Glue sticks
Popsicle sticks
Acrylic Paint
Markers for pattern and details
Examples of pattern and lines

Vocabulary:
Sculpture
Dimension/Form
Pattern
Line

Tuesday, February 1, 2011

8th Grade: Contour Line Drawings of Hands with Watercolor Background


Day 1: (50-70 min) What is a contour line? Demonstrate several warm-up activities, including drawing the creases of the palm of your hand and a blind contour line drawing of a hand gesture, stressing the importance of looking at what you are drawing. Discuss the Right Brain vs. Left Brain. Students should complete one drawing of a gesture that they are pleased with on newsprint. This gesture will be traced three times on 12 x 18 90lb white drawing paper with Sharpie marker. Cut hands out.

Day 2: (50-70 min) What are warm colors? Cool colors? Have students create a design of various shapes on watercolor paper with stencils. Students will decide if they want warm colored shapes, or cool ones. Shapes will be outlined with warm or cool colored crayons as this helps to contain watercolors when painting. What is a watercolor wash? Demonstrate the 10 watercolor washes listed below. Have students practice on 3 x 12 inch strip of WC paper. For background, students must incorporate all ten WC washes. If the shapes are warm, background is cool and vice-versa. This helps prevent muddled colors.

Day 3: Finish painting and hands (if not done yet). Attach three cut out hands in an interesting way to the WC background with 3D-O's

Watercolor Washes:
Wet-on Wet     Even
Glazing           Gradual
Blotting           Resist
Salt                 Splatter
Blow               Dry Brush

Vocabulary:
Contour Line
Negative Space
Observational Drawing
Watercolor wash
Warm and Cool colors

Materials for Hands:
Drawing boards
Sharpies
Newsprint
12 x 18 drawing paper
Light table
3D-O's


Materials for Watercolor Background:
Stencils
Crayons
Dr. Martin's Watercolors
Palettes
Brushes
Water Containers
Paper towels
Kosher Salt
3 x 12 strip of watercolor paper
12 x 18 watercolor paper